
Today we will write the program that will allow control of the moving robot from a "virtual joystick" consisting of moving the mouse cursor on a figure in Matlab.
Post your programs on your website. They should be well-commented so I (or anyone else) can understand what the statements in each program do. Test the programs in sections as described below. Every part should work together to achieve smooth control of the robot. Teams are OK but every member of the team should understand how the programs work.
If you find that you would like extra help, the following resources are available:
Using the program sections in Matlab 3, write a program (script) that allows your robot to move forward by a sequence of motor movements starting from a known arm configuration that 1) extends the arm, 2) touches it to the ground ahead of the robot, 3) pulls the robot forward and up (by pulling down and back toward the robot), then 4) returns to the original arm postion. Start with 3 distinct calls (fprintf statements) to individual motors, allowing each motor to complete the movement before the next one starts (for debugging purposes).
Extra credit: do the same for reverse motions, allowing the robot to put its foot on the ground close to the front and pushing down and forward to drive the robot backwards. Put this reverse motion in a separate script/program/m-file from the forward motion.
Put the program(s) on your website so I can test them.
Make a new version of your forward/backward one-step motion by using a "FOR" loop to loop several steps (i.e. make the loop move forward or backward e.g. 4 steps using "for i=1:4"). Once you've got this working, experiment with putting the calls to individual motors together into one call with different Timing rates for each motor to create a less jerky, smoother motion.
Put the program(s) on your website so I can test them.
Create a new "function" m-file with the name "main" after the word "function" on the first line of the file. Place the word "end" on the last line of the file, directly underneath the word "function" and Save As the program with the name of your robot (don't forget the .m suffix). This program is a shell program into which you will insert program statements to control your robot.
Type in the following lines between the "function main" line and the final "end" line, then Save and run the program. It should print on the screen a figure with X- and Y-axes that go between 0 and 1 with a horizontal blue line and a vertical red one centered on each axis. Under the horizontal axis, the words "left" and "right" should be printed, with "fast" and "slow" on the vertical axis. The program should then terminate, leaving the figure in a new window (which you can dismiss by clicking its red X).
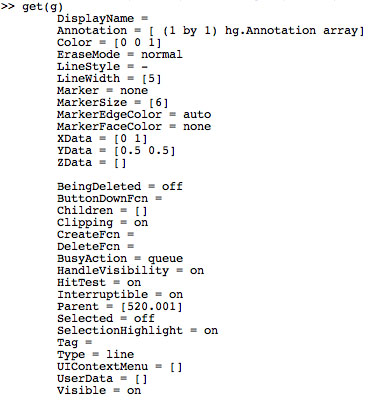
You should understand what each of the above commands does (you can test them by typing each one individually into the command prompt, after a figure window is open). Also you can type "help line" or "help text" or "help axes" to the Matlab prompt for more information. Once the figure "f" is defined, along with the red and blue lines, the "get" function tells all the properties associated with those lines. For the blue horizontal line:
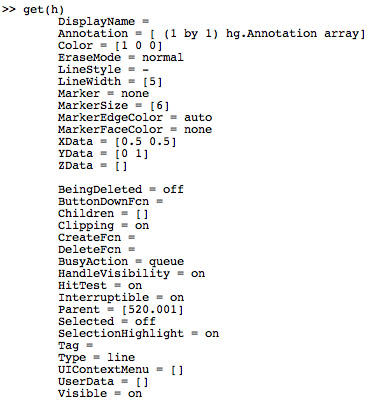
And for the red vertical one:
We will use the figure as a virtual joystick by telling Matlab to track the location and state of the mouse cursor (i.e., whether clicked down or released up) in this figure. We can also tell whether a key on the keyboard has been pressed down or released up. This is accomplished by associating the figure window "f" with various functions we will write and then include in the same m-file (i.e. between the "function main" and final "end" statement) we are now building.
Copy the following code lines under the above ones (and before the final "end" statement) and run the program again:

You can type "get(g)" and "get(h)" again and see the functions now listed next to the corresponding conditions. The functions we are calling are the ones after the "@" sign; they don't yet exist but will be called when the conditions in the middle argument of the "set" function are met. If you look at the properties of the blue "g" line and the red "h" line above, you can see that these conditions trigger the execution of the functions that are preceded by the "@" signs.
Now that we have associated the blue and red lines with the functions, we just need to define the functions. We will start with the one that is called when a "mouse down" or click occurs in the figure window, startDragFcn:
![]()
Type this in above the final "end" and after the previous code. It may seem pointless to call yet another function (draggingFcn) but we want to detect cursor movement, not just mouse click, to know if we should re-draw the lines at the current mouse cursor position. Instead of "f" we are using "gcbf" which stands for the currently active window. Under this, type the following:

Not only will this function redraw the red and blue lines so that their intersection of the current mouse cursor drag position, but the X-value (on the 0 to 1 scale) and Y-value (also 0 to 1 scale) are printed in the title. Later, we can use the X-value in pt(1,1) to set the angle of motor 1, which causes the robot arm to aim right or left. The Y-value in pt(1,2) can be used to change the timing of the motor sequence so that the robot moves as fast as possible or as slowly as possible. For now, however, we will finish off this sequence by defining what to do when the mouse button is released up:

Type this function under the previous one, and just above the final "end" statement, then Save and run to test the graphics and see if the cursor-tracking works. If so, contratulations, you're nearly done building the shell program that will control your robot.
You can imagine that you can steer the robot around, telling it to pull left or right and to move the arm fast or slow by adding the program lines you previously used to make the robot take one step forward/backward below the last line of the draggingFcn function (but above its "end" statement). Before you insert and test your robot control, however, it would be a good idea to make the robot stop and set its motors in a quiescent state or known arm configuration. Insert the program lines to stop the robot in the function below, which should be added before the final "end" statement of the "function main" program shell:

This would be a good point to test and see if you can get the robot to move around. If not, look carefully at your program to see how it compares to these statements or ask a wizard/professor for help.
The final modification to this program is to have this shell program recognize keystrokes typed on the keyboard while the figure is active. We will use certain keystrokes for certain types of robot behavior, such as a "left tagging gesture" to reach out to the left and touch the other robot or a "right tagging gesture" on the right. Insert the following function above the final "end" statement in the m-file:

This function, run when a keyboard key is pressed, recovers which key is pressed and prints it on the screen. Feel free to make up a "gesture" or motor sequence fprintf command and insert it instead of the "initiating tag gesture" line above. Save and run the modified program and see if typing the "w" key causes the robot to make that gesture. Does it stop or return to galumphing afterwards?
When the program controls the robot, post it on your website, along with an explanation of what the program does. The remainder of the robot project will involve optimizing this program so that the robot can race other robots with efficient movement or chase/flee during the final game of Tag.